In many scenarios, you may need different users can visualize different cube data or attributes according to its role in the company.
WorkWithPlus for BI has the possibility to grant security access to a cube in two different levels:
- define which attributes a user can visualize within a cube
- define which data a user can visualize within a cube
In this example, we are going to learn how to set these levels by a step-by-step example. For this example, we are going to use the cube created on WorkWithPlus for BI Online Training
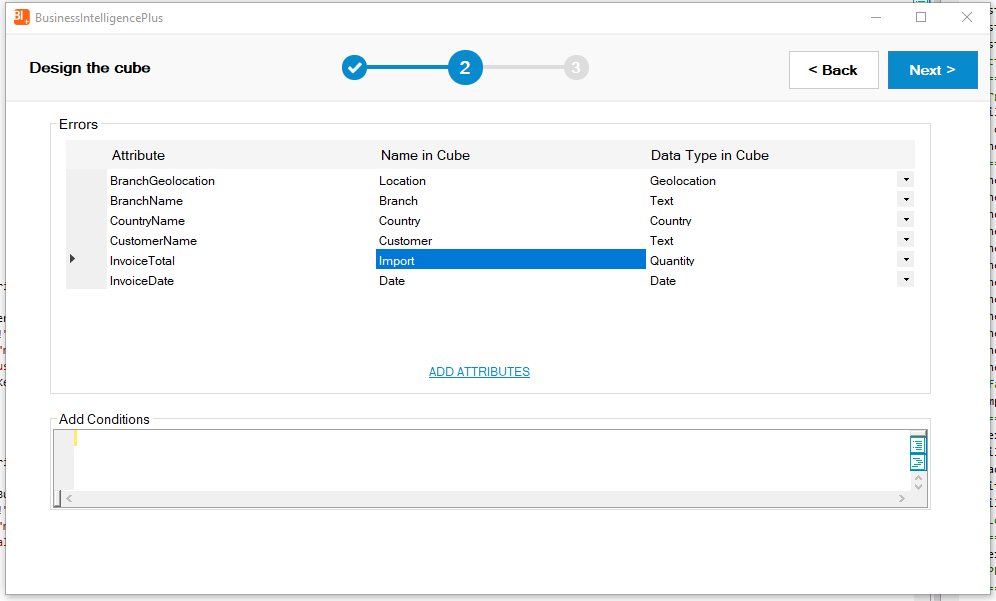
The cube has the following structure:
Comment: this cube was created on a KB where GAM is enabled, so we are going to explain how to add security to the cube considering that you are managing your security schema by using GAM. If you are using another security schema the steps to follow are quite similar.
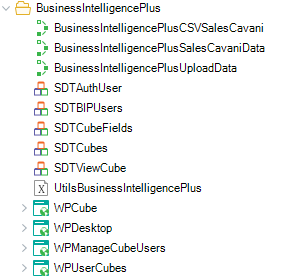
When you create a cube, BusinessIntelligencePlus imports a folder called "BusinessIntelligencePlus" where you can find some useful objects:
For each application user, we are going to grant security in order to:
- let each user can only query data regarding its own company
- visualize every attribute from the cube but the "Customer" attribute as it has no sense because it will only show data from the user's company
Comment: the company of each sale is saved in the "Customer" attribute of the cube.
When a new user is registered within GAM interface, we are going to create the corresponding user within the cube. To achieve this, you should include the following code in the "GAMUserEntry" panel:
If &PasswordIsOK
   If &User.Success()
      /******Create user and cube for the new GAM User****************/
      &CompanyName=GetUserCompany(&UserName)
      call(BusinessIntelligencePlusSalesCavaniData,&ds,&dsload,&myusername,&mypassword,&server,&proxyip,&proxyport)
      BusinessIntelligencePlusManageSecurity(&UserFirstName,&UserLastName,&UserEmail,&UserName,"Customer",&CompanyName,11)
      commit
      return
   Else
       &Errors = &User.GetErrors()
       For &Error in &Errors
         Msg(Format(!"%1 (GAM%2)", &Error.Message, &Error.Code))
       EndFor
   Endif
Endif
Comments:
- "GetUserCompany" is a procedure that returns the company of the created user. This is just an example, you can get the company from a table, a web service, etc.
- "BusinessIntelligencePlusManageSecurity" can be downloaded from here. It has commented code that you should customize in order to adapt it to your scenario.
Once the user is created, we should define which attributes he can visualize and which data it will be able to query. BusinessIntelligencePlusManageSecurity receives by parameter the following data:
parm(in:&newUserName, in:&newUserLastName, in:&newUserEmail, in:&newUserNameNick, in:&filterAttribute, in:&filterValue, in:&condition)
Where:
- &newUserName is the First Name of the new user
- &newUserLastName is the Last Name of the new user
- &newUserEmail is the Email of the new user
- &newUserNameNick is the Username of the new user
- &filterAttribute is the attribute that will be used as a filter. This attribute won't be visualized in the cube.
- &filterValue is the value that will be checked in the condition.
- &condition is the operator that will be used within the condition. The possible values are:
- 1: '='
- 2: '<>'
- 3: '>'
- 4: '<'
- 5: '>='
- 6: '<='
- 7: 'IN'
- 8: 'NOT IN'
- 9: 'BEGINS'
- 10: 'END'
- 11: 'CONTAINS'
On the previous example, we set the following values to the BusinessIntelligencePlusManageSecurity call:
- &filterAttribute: "Customer" --> This means that we are going to filter the cube data by using its "Customer" field. This attribute won't be visualized in the cube.
- &filterValue: &companyName --> Each user can visualise records regarding its own company.
- &condition : 11 --> The condition will check for the records where the field "Customer" contains the value set on &companyName
This procedure is almost ready to use. You should customize the following line in order to use your own cube data:
call("BusinessIntelligencePlusSalesData",&ds,&dsload,&username,&password,&server,&proxyip,&proxyport)
You should also, set the proper application id, in the last parameter of the following line:
&user=UtilsBusinessIntelligencePlus.CreateUser(&server,&newUserName,&newUserLastName,&newUserEmail,&newUserNameNick,"","",&token,2)
Finally, you should establish the cube's name for each user:
&cubename="Sales"+&newUserNameNick
In the "WPCube" web panel we should load the proper cube according to the user. To achieve this we are going to add the following code:
Event Start
    javascript.Caption="<script>$('iframe').parentsUntil('TABLEMAIN_MPAGE').css('height', '100%');</script>"
    javascript.Caption+="<script>$('#TABLEMAIN_MPAGE').css('overflow','hidden');</script>"
    call(BusinessIntelligencePlusSalesCavaniData,&ds,&dsload,&username,&password,&servername,&proxyip,&proxyport)
    &username=GAMUser.GetName()
    &biptoken="bc83c41b8c4f7c65f8e36ff657aaec91c7740d9226dd2aa3e05174c5bc96c1604495f342385f0e3f62bde17388e28f3d668f73a1b02010dc12c3e883cb64cd88"
    &token=UtilsBusinessIntelligencePlus.LoginCubeUser(&servername,&username,"","",2,&biptoken)
    &cubesJSON = UtilsBusinessIntelligencePlus.GetUserCubes("https://services.bip.dvelopsoftware.com/","","",&token)
    &cubes.FromJson(&cubesJSON)
    for &cube in &cubes
      if (&cube.name="Sales"+&username)
        &ds=&cube.id
        exit
      endif
    endfor
    &url="https://app.bip.dvelopsoftware.com/timeline/"+trim(&ds.ToString())
    &css="https://bip.dvelopsoftware.com/dvelopRedMaterial.css"
Endevent
Comments: The LoginCubeUser method receives as parameters the: servername, username, proxyip, proxyport, application id, and application hash.
Usually, the proxyip and proxyport are not necessary, so we just leave them empty.
The application id and application hash are unique for each company. For the training users, the values are the following:
- Username: TrainingEnglishUser
- application id : 3
- application hash: cc2fd84db36ae5749eb4417b0e330dc8a58056f2e21b681776f54276453aa54ea16d36a0bf8f9a8cadda65404fc5e858045fc652d495932a9ce887aca6112f2c
- Username: TrainingUser
- application id : 2
- application hash: bc83c41b8c4f7c65f8e36ff657aaec91c7740d9226dd2aa3e05174c5bc96c1604495f342385f0e3f62bde17388e28f3d668f73a1b02010dc12c3e883cb64cd88
If you are working with your own user, you should request these data for your own company.
Troubleshooting:
When working with C# you may get the following error at runtime:
Could not load file or assembly 'Newtonsoft.Json, Version=9.0.0.0, Culture=neutral, PublicKeyToken=30ad4fe6b2a6aeed' or one of its dependencies.
The located assembly's manifest definition does not match the assembly reference. (Exception from HRESULT: 0x80131040)
In order to fix that error, you should add the following code in your web.config:
<runtime>
   <assemblyBinding xmlns="urn:schemas-microsoft-com:asm.v1">
     <dependentAssembly>
       <assemblyIdentity name="Newtonsoft.Json" publicKeyToken="30ad4fe6b2a6aeed" culture="neutral" />
       <bindingRedirect oldVersion="0.0.0.0-10.0.0.0" newVersion="10.0.0.0" />
     </dependentAssembly>
   </assemblyBinding>
 </runtime>
Source: https://stackoverflow.com/questions/48334561/getting-issue-as-could-not-load-file-or-assembly-newtonsoft-json-version-9-0-0
|